A broken vinyl gate hinge can be a real nuisance, disrupting the smooth operation of your gate and potentially compromising the security of your property. As a trusted Vinyl Gate Hinge supplier, we understand the importance of a properly functioning gate hinge. In this guide, we'll walk you through the step - by - step process of replacing a broken vinyl gate hinge, ensuring that you can restore your gate to its former glory.
Step 1: Gather the Necessary Tools and Materials
Before you start the replacement process, it's essential to have all the right tools and materials on hand. This will save you time and frustration. The tools you'll need include a screwdriver (both flat - head and Phillips - head, depending on the screws used), a drill, a measuring tape, and a level.
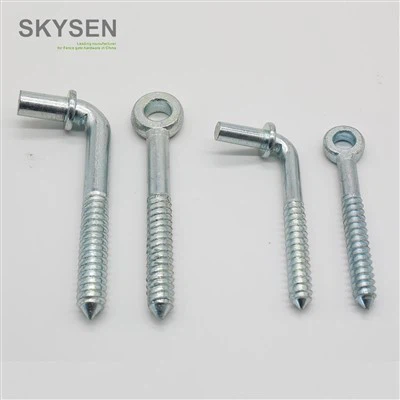
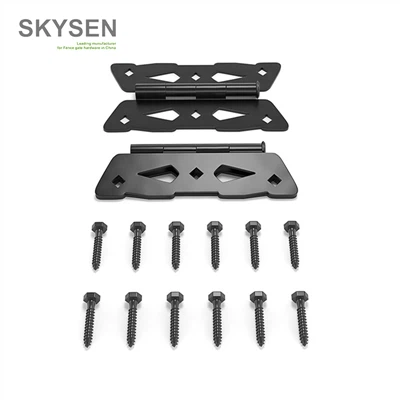
For materials, you'll require a new vinyl gate hinge. You can find a wide selection of Pvc Fence Gate Hinges on our website. Additionally, you'll need Stainless Steel L - type Screws to secure the hinge in place. These screws are corrosion - resistant, ensuring long - term durability. You might also need Vinyl Fence Connectors if your gate has a more complex structure.
Step 2: Remove the Broken Hinge
The first step in replacing the hinge is to remove the broken one. Start by opening the gate fully to gain easy access to the hinge. Use your screwdriver to remove the screws holding the hinge to the gate and the post. If the screws are stubborn or rusted, you may need to use a drill to carefully remove them.
Once all the screws are removed, gently lift the broken hinge away from the gate and the post. Be cautious as the gate may be heavy, and you don't want it to fall or cause any damage. If possible, have someone assist you in holding the gate steady during this process.
Step 3: Measure and Prepare the New Hinge
Take your measuring tape and measure the dimensions of the area where the old hinge was attached. This will ensure that the new hinge fits perfectly. Compare these measurements with the dimensions of the new hinge you've purchased.
If the new hinge needs to be adjusted, use a saw or other appropriate cutting tool to make the necessary cuts. However, most of our Pvc Fence Gate Hinges are designed to be a standard fit, minimizing the need for extensive adjustments.
Step 4: Attach the New Hinge to the Gate
Place the new hinge against the gate in the same position as the old one. Use the level to ensure that the hinge is perfectly vertical. This is crucial for the proper functioning of the gate. Once the hinge is level, mark the screw holes on the gate using a pencil.
Next, use your drill to create pilot holes in the gate at the marked locations. This will prevent the vinyl from cracking when you insert the screws. Insert the Stainless Steel L - type Screws into the pilot holes and tighten them using a screwdriver. Make sure the screws are tight but not over - tightened, as this could damage the vinyl.
Step 5: Attach the New Hinge to the Post
With the hinge attached to the gate, it's time to attach it to the post. Position the gate so that the hinge aligns with the corresponding location on the post. Use the level again to ensure that the hinge on the post is level with the one on the gate.
Mark the screw holes on the post and drill pilot holes. Insert the screws and tighten them securely. If your gate requires additional support, you can use Vinyl Fence Connectors at this stage to provide extra stability.


Step 6: Test the Gate
Once the new hinge is securely attached to both the gate and the post, test the gate to ensure it operates smoothly. Open and close the gate several times, checking for any signs of sticking or misalignment. If the gate doesn't open or close properly, you may need to adjust the hinge slightly.
You can do this by loosening the screws slightly and re - positioning the hinge. Once you're satisfied with the gate's operation, tighten the screws again.
Step 7: Maintenance Tips
To ensure the longevity of your new vinyl gate hinge, it's important to perform regular maintenance. Keep the hinge clean by wiping it down with a mild detergent and water. This will remove any dirt or debris that could cause the hinge to malfunction.
Inspect the screws periodically to make sure they're tight. If you notice any signs of wear or damage, such as rust or cracking, replace the hinge or the screws immediately.
Why Choose Our Vinyl Gate Hinges
As a leading vinyl gate hinge supplier, we take pride in offering high - quality products. Our Pvc Fence Gate Hinges are made from durable materials, designed to withstand the elements and daily use. We use the latest manufacturing techniques to ensure precise fit and smooth operation.
Our Stainless Steel L - type Screws are corrosion - resistant, providing long - term reliability. And our Vinyl Fence Connectors offer additional support and stability for your gate.
Contact Us for Your Purchase
Whether you're a homeowner looking to replace a single broken hinge or a contractor in need of a large supply of gate hinges, we're here to help. Our team of experts can provide you with all the information you need to make the right choice for your project.
We offer competitive prices, fast shipping, and excellent customer service. If you have any questions or would like to discuss your requirements, please feel free to reach out to us. We look forward to working with you and helping you find the perfect vinyl gate hinge solutions for your needs.
References
- "Vinyl Fence Installation Guide" by Fence Manufacturers Association.
- "Maintenance and Repair of Exterior Gates" by Home Improvement Today Magazine.